
I thought I deserved it because I stayed at campus till late~ haha.
I'm really starting to like the girly style with incorporations of peter pan collars, bows, high waist skirts, and frills for that doll like look. I guess in the mainstream, its the super down-toned version of lolita fashion. It's good to wear for everyday clothes.
When I saw the detachable collar in fashion magazines, I fell in love! They add a little extra to a regular casual outfit, and they are quite easy to make too.
I just wanted to make the basic one for practise tonight. But now I have a better idea of how it works, so next time I shall make the detachable peter pan collar. With dun dun dun, LACE!? Ooh, I can't wait!

I also took some bad quality photos of my process, so I thought I would do a little tutorial.
If you would like to see it, please read under the cut!
Warning: Picture heavy
Detachable Collar Tutorial
What you need
♥ Sewing Machine
♥ Paper and writing utensils
♥ Collared Shirt
♥ Thread of choice
♥ Fabric of choice
♥ Needle and Thread
♥ Snap Fasteners
♥ Pins
Method
001. First grab a shirt you have with a collar.


003. Trace around the shirt collar, and draw a line where the collar and the collar base separate.

004. Cut out the shape, and also cut through the line in between. I kept this pattern as a base template.

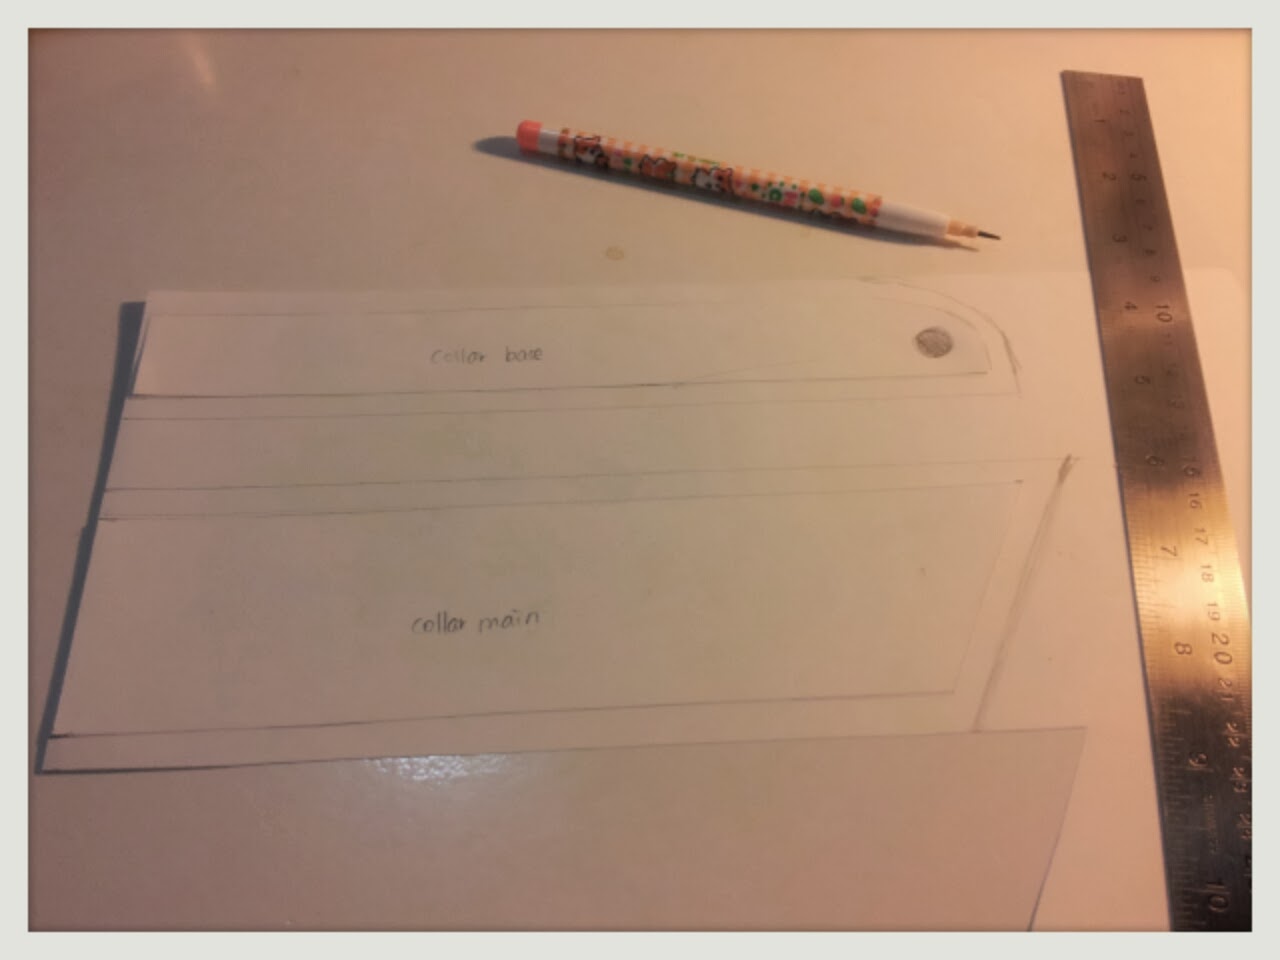
005. We now use the base template to create the pattern for this detachable collar. Lay down the pattern pieces on new paper, making sure there is space around to draw the seam allowance. The centre part (left side of my pattern) can touch the side of the paper, because this will be where we fold the fabric.
Trace around the original base template, and then draw a line about 1/4 inch from the trace. You can adjust this depending on the seam allowance you want to use.
Cut these pieces out, and mark them as "Collar Base" and "Collar Main". It's a good to also note down that the side edge is a centre fold.
006. Fold the fabric you are using in half. Place the pattern pieces with the side on this centre fold and pin them in place. You will need to cut two pieces of each item, so do this twice.
For this collar, I didn't use interfacing but if you want to make the collar more stiff and durable, its probably a good idea to use this too. You will use the same pattern to cut out the interfacing.

007. Yay, all cut out. Proceed to iron your fabric pieces. I didn't have an iron available in the apartment so I left it as it. It definitely makes things easier if you do.
You can now zig-zag stitch or overlock the sides of each pattern piece (if you have a fraying fabric). I didn't do this because I was a bit lazy this time ;; But, I suggest you do it if you want it to last longer though.

008. Get the two main collar pieces and put the right sides (side you want showing) together so that what you see is the reverse side of the fabric. You will be sewing the two short sides and the long side. Pin the pieces together ready for sewing.

009. All sewn! Cut the corners off. Now it is time to turn it over.

010. Now, proceed to iron this down

011. It might be hard to see in this photo. But now, grab your collar base fabric pieces and lay one down with the right side facing up and the curved edge pointing up on the table. You then place your sewn collar with raw side pointing up and in the center of the collar base fabric.

012. You are essentially sandwiching the sewn collar base in between each piece of the sewn collar with the right sides inside. So, place the remaining piece of fabric face down on top of the other layers.
Proceed to pin that top edge. Sew around the top side, around the curves as well.

013. All sewn. Now, you can take out the pins and turn the collar base out.

014. Once you have turn it out, proceed to iron the fabric down again.
I didn't have an iron handy, so I just pinned this part down to make it easier to work with.

014. We are almost done. The bottom just needs to be hemmed. If you have an iron, you can push about a 1/4 inch of fabric to the inside and iron it in place. As I have mentioned, I didn't have an iron so I just pushed the fabric in as I fed it through the machine (which is slightly trickier).
Here I am showing an example of the top part being folded back inside.
Sew along the folded edge with a tiny seam allowance.

015. Once you are done sewing that part, you can now fold the collar into shape. You can now take the snap fasteners and sew them to the front flaps that extend beyond the collar.

016. Pretty much done now ^^ You can now customise this however you want.
I have a bow I had made earlier and attached this with a safety pin to the front of the snap fastener.

017. And now we have a new fashion accessory~ hell yeah!

I hope this wasn't too confusing to understand! Have fun if you are going to try it out~
Reflections
♥ This was a pretty basic pattern, so next time I would to make something more ambitious
♥ Could try different coloured fabrics for variation
♥ Could try making a range of them with different embellishments on the front
♥ Could try a bigger collar, by extending the original pattern
♥ PETER PAN COLLAR NEXT TIME FOR SURE!
No comments:
Post a Comment